Pages

Showing posts with label Beef. Show all posts

August 06, 2010

Chili for realz

I'm informally designating today as my one-year anniversary of hardcore cooking. Good friends and regular readers already know this story. So y'all can skip the next two paragraphs. Go on ahead, I'll never know.

Last August, I came home from a month of speech camp with massive anxiety. No job, no prospects, and badly banged-up self-esteem. I decided, if I wasn't going to be adding any income to the household, the least I could do was contribute work that would cut down our weekly expenses.

Hence, the cooking. For less than a hundred bucks a week we could both eat really, REALLY well. This year, as I'm about to re-enter the workforce, I'm feeling kind of angsty about where the time to cook will come from. Gotta work on my repertoire of things that re-heat well. Gotta do something, cuz the thought going back to takeout kinda disgusts me now.

Yep, I've turned into one of those a*hole food people.

One thing on the agenda is to make gallons -- literal gallons -- of chili. Right now, while tomatoes are cheap and taste perfect. Chili keeps well in the freezer for months, so the more I crank out, the more quick meals I'll have through the fall.

I know I've covered chili on this blog before, but I wanted to share the recipe with fresh tomatoes instead of canned. The process isn't substantially different. Just a little more prep but a lot more flavor. I don't know who invented chili, but bless their memory all the same.

Chili on the "For Real" (a.k.a. with fresh tomatoes)

What I used:
  • 1/2 cup dry red kidney beans, rinsed and soaked overnight
  • 8 or 9 medium tomatoes (I can't remember for sure -- say a pound pint* and a half)
  • 2 pounds ground beef
  • 1 large sweet yellow onion
  • 1 medium green bell pepper
  • 1 small red bell pepper
  • 4 stalks celery
  • 4 large garlic cloves
  • Anaheim, serrano, and red and green jalapeno peppers
  • 5-6 shakes mild green Tabasco sauce
  • Cumin, parsley, cilantro, and cayenne
  • Salt and pepper
Phew! Okay, so the first thing was to pre-cook the beans. Following the package directions, I let them go for a good hour before starting the chili prep proper. Next I put the ground beef on medium heat with some salt and pepper, and blanched my tomatoes.

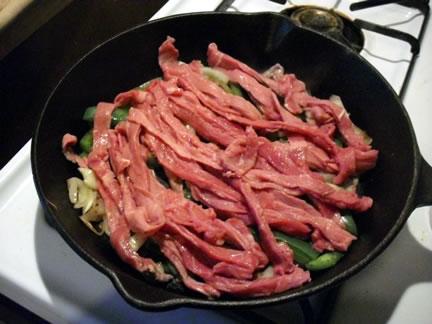
In two batches, because I was using my big pot for the chili -- duh...

I was thinking the other day, I don't believe I've ever broken down my blanching philosophy. I bring the water to a good rolling boil, then carefully add the tomatoes (or peaches, or green beans, or whatever). Then I bring the water back up to boiling, and let it go for 3-5 minutes. For these tomatoes, I gave them the whole five. After that I fished them out with a slotted spoon and gently relocated them to a giant bowl of ice water.

While all that browning and boiling were going on, I was chopping up all the veggies except the hot peppers. Those go in later. Then I put the browned beef aside and drained most of the grease, using what was left to sweat down the veggies.

Oops. Over-drained the grease. No worries, just sprinkle in some olive oil.

You'll notice I used celery here, which falls outside my usual onion-bell pepper-garlic trinity. In this recipe it adds some much-needed moisture. Without the extra juice from canned tomatoes, that's a big bonus.

Once the onions started turning slightly transparent, I dumped in the beef and beans and reduced the heat to low.

The beans should be *almost* done at this point. Think al dente.

Next went in the tomatoes. Again, to conserve moisture, I peeled and shredded them right over the pot. That way all the drips ended up in the chili and not on the cutting board. I hope it goes without saying, I cut out and discarded the stems.

It was looking a little dry, so I added in a few ladles of the tomato-blanching water. Then I stuck a lid on all that and let it simmer while I diced up the spicy peppers.

L-R: 1/2 a serrano, 1 red jalapeno, 1 green jalapeno, and 1/4 Anaheim

I chucked those in the pot and added the Tabasco, cumin, parsley, and cilantro. Taste. Oddly not that spicy. So I added some cayenne. And a little more salt and black pepper.

Stick on the lid and it's ready to simmer.

Now my favorite part of chili making. Walk away. Go do other stuff. I mean, I do check on it from time to time, give it a stir and a taste, maybe adjust the seasoning. But the standing around, bent over a cutting board? That crap is over. I gave it an hour, maybe more. The biggest thing was making sure the beans were good and tender.

Actually, forget what I just said. THIS is my favorite part of chili making...

You know, the eating.

We had some for dinner, and lunch the next day. The rest I stored in a freezer bag. I'll be super grateful to thaw that out, some chilly night this fall. (See what I did there? That joke's for my Dad.)

Yeah, it took a while, but most of that time was spent sitting on my butt. And it's so worth it, to have real-life-from-scratch chili! I bet this would be awesome in a crock pot too. If I had a crock pot. Are you listening, Santa?

I close, dear readers, by begging for your favorite freezable recipes. I've got two weeks until school starts and I need to do some hoarding. Recommendations?

Updated Aug. 10: Pints? Pounds? Whatever! Read what you write, girl.


July 17, 2010

Beef and broccoli for cheaters

You know how sometimes, you get to the end of the week, and you don't want to deal with the grocery store, but you still have to cook, because -- well, you know -- you're hungry? That can't be just me, can it? I hope not, because it sure happens around here, allthefreakintime.

When it does, I find myself with my head in the fridge, inspecting the slim pickings, and trying to imagine how they all might go together. It doesn't always work out. Sometimes a grocery run is totally unavoidable. I thought I'd come to that point with this dish, before I figured out a cheat.

So what did I find when I raided the fridge?

These veggies...

and this meat.

Broccoli, onion, garlic, and beef -- making Cantonese style beef and broccoli an obvious choice. Except that Chef Google was adamant that authentic beef and broccoli required ingredients I didn't have. Well screw it then. I was gonna have to cheat.

Beef and broccoli for cheaters

First I put on some long-grain white rice, according to package directions. Then I set a skillet over medium to preheat. Last, I started heating about 2 inches of lightly salted water in my stove-top steamer.

Forgive me, folks, for the gross lack of pictures here. A three-burner project is a lot to manage, especially when I'm starved and cranky. But wouldn't I be a condescending bitch if I explained how to steam broccoli anyway? Just go with me...

Once the skillet was hot I added a tablespoon or two of sesame oil and brought that up to temperature. Meanwhile I was slicing up the beef into thin strips.

They call this cutting "on the bias." Why not just "diagonal?"

I used cubed steak for this particular dish. I like it because I find it on sale pretty often, and it's useful for a variety of applications. If I ever master chicken-fried steak, for example, you'll be sure to see this ingredient again.

I also broke down the broccoli into florets, and the onion into smallish slices. The garlic, I minced.

By the time all that chopping was done, my steamer water was boiling and my sesame oil was sizzling. So, into the oil went the thin-sliced beef with a bit of salt and pepper. The broccoli went into the top tier of the steamer.

I let the beef get slightly brown before tossing in onion and garlic.

Imagine the burst of aroma!

After a minute or two I turned the heat to low, and proceeded with my cheat. I had about 1/4 of a bottle of oyster sauce in the fridge, which I dumped in the pan.

I'm guessing this is not authentic.

Before long, my broccoli was getting done steaming: bright green and just fork tender. I stirred that into the skillet, and realized I had two problems. One, there wasn't enough sauce to coat everything. Two, I wasn't really digging on the flavor I'd created.

The solution to both problems came in the form of some soy sauce, lemon juice, and ground ginger. I couldn't begin to tell you how much of each of these went in there. I just kept sprinkling and tasting until I was happy. But when all was said and done, damn I was happy!

Except with this picture. 

But overcooking was not an option.

I served the beef and broccoli with the long-grain rice I breezed over earlier. Which? Led to an important discovery. If you want a good, sticky, chopstick-friendly rice, you gotta skip the butter called for on the rice package! Duh, I guess. But, live and learn...

Not bad for a dirty cheater

Doug flat freaked out over this. And it was super yummy, if I do say so myself. Guess I ought to fix Chinese more often. Only next time I'd like to try a more authentic approach.

Last thought: even though this dish uses three burners, it's an ideal summer dinner. The whole thing took no longer than 25 minutes, brilliantly limiting the heat I kicked out. Hooray for late-week desperation dishes. They are my enduring inspiration.

What inspires you to try new things?


March 30, 2010

Who says Creation & Evolution must be enemies?

Naw, I'm not about to break bad on the Texas school board or anything. There's a time and a place, and this is neither.

This weekend I fixed up some Philly cheesesteaks, which I have long heralded as the #1 most fit-to-eat dish invented by Yankees. I love them because they're simple and delicious, and use vegetables my husband likes. Yes, I married Mikey from the Life commercials. Those Pop Rocks rumors are greatly exaggerated.

Philly Cheesesteaks 

What to use...
  • Half a large onion
  • Half a large bell pepper
  • 5-8 garlic cloves (depends on their size)
  • 1/2 lb. thin-sliced steak (for extra meaty, yummm)
  • 2 tbsp. olive oil
  • Salt & pepper
  • 5-6 slices provolone cheese
  • 2 hoagie rolls
Coarsely chop the onion, pepper, and garlic. Put a cast iron skillet over a medium burner to preheat.

Can I just start calling this the Trinity?

Lay out the steaks on a cutting board. My germophobia demands I have separate cutting boards for veggies and meat. I know. Cue the guys with butterfly nets. 

Anyway, for this meal I bought thin-sliced top round, but my rule is to buy what's on sale. That's the beauty thing about thin slices; you can buy less expensive cuts and they're not going to be tough. If you have a meat slicer or a good relationship with the butcher, you can buy the cheapest beef available and slice/have it sliced to your liking.

This lot? Under $2!

At this point the cast iron should be plenty hot, so add the oil. I'm a big olive oil proponent, but just about any fat will do here. Now, to make the next step ridiculously easy, roll up the steaks. There's a fancy French word for this knife technique, but my Google muscle is lazy today.

Tube steak. 
*giggle* 
I'm ashamed...

Focus, Misty! By now you can throw the Trinity into the skillet with some salt and pepper. Stir it around a bit to distribute the oil.

Won't take long for the onion to caramelize.

Next, slice through the roll at 1/4- to 1/2-inch intervals. The result will be nice thin strips.

Perfect for cheesesteak.

Unroll the strips and place them over the veggies.

Add a little more salt & pepper, if desired.

Turn the oven to 350° in anticipation of warming the hoagie rolls. Flip the mixture in sections, so the meat is mostly on the bottom. Now, grab a serrated knife, and, wait... uh-oh... is that mold?

@!#?@!

Go ahead and take a moment to berate yourself for not checking the @!#?@! bread ahead of time. But don't panic. You've got tortillas in the fridge right? Sure you do!

Philly Cheesesteaks Beef Fajitas

What to use...
  • Half a large onion
  • Half a large bell pepper
  • 5-8 garlic cloves (depends on their size)
  • 1/2 lb. thin-sliced steak (for extra meaty, yummm)
  • 2 tbsp. olive oil
  • Salt & pepper
  • 5-6 slices provolone cheese Fajita seasonings
  • 2 hoagie rolls Tortillas
  • 1 plum tomato
  • Fajita toppings (optional)
Who says do-overs aren't for grownups?

Add generous amounts of Red Hot, green Tabasco, cumin, and cilantro to the skillet. Slice up a plum tomato and add that too. Stir frequently until the beef is good and brown, and the liquid has reduced.

You know what? That looks fit to eat too!

Wrap the tortillas in damp paper towels and microwave, about 30 seconds for two burrito-sized tortillas. Assemble and serve.

I like a little sharp cheddar & some sour cream.

And unless your husband heard you swearing and came in to see if you'd burned yourself, no one will ever be the wiser. See? Creation and Evolution, strolling happily hand in hand!

March 21, 2010

Steak on the barbie

How do we at Casa York celebrate sunny skies, the start of spring, and college hoops to die for? With steak, silly!

Grilled New York Strip with Steakhouse Sides

What I used:
  • 2 steaks
  • 1 large onion
  • 4 or 5 cloves of garlic
  • Worcestershire
  • Pepper sauces
  • Salt & black pepper
  • 2 large potatoes
  • Butter & sour cream
  • Salad fixins
I believe in honesty in blogging, so there's a hint of confessional in today's post. Pretty much nothing turned out just right for this meal. Thankfully nothing turned out inedible, either. On to the run-down...

While Doug was washing up the breakfast dishes (I am so spoiled), I got the steaks started marinating.

 Thin-cut New York strips

On sale, these babies were $2.25 apiece. Hooray for affordable luxuries! First I lightly salted and peppered both sides. Then I smashed some garlic cloves, and rubbed them on the surface. I tossed in about a half an onion, coarsely cut, and added some celery seed and cilantro.

Note: marinates are a great way to use vegetable scraps, if like me you don't have compost collection. Celery leaves, bell pepper seeds, and lemon peels often make their way into my marinates. I didn't have any of that stuff on hand this particular day. Just throwing it out there.

Next I added the liquid ingredients.

 Artistic? Or just off-center?

A few splashes of Frank's Red Hot and green Tabasco went right on the meat. Then I poured Worcestershire around the edges, until the bottom of the dish was covered. I added enough water to bring the liquid level with the tops of the steaks.

Cover and pop in the fridge.

We watched basketball for a few hours before I started the potatoes. I scrubbed them in cold water and set them on squares of aluminum foil. Here's where things started coming apart. Queen Forgetful over here keeps forgetting to buy proper coarse salt. So plain old Morton would have to do. While the potatoes were still damp, I poured salt into my palm, and rubbed it all over the skins.

Aaand, you can't see the salt. Awesome.

Rolled 'em up nice and tight, put 'em in a baking dish, and popped them in a 350° oven. Mishap #2. I checked them after 30 minutes and they weren't getting done at all. Cranked it up to 400° and sulked. I was freakin HUNGRY already! Soon, it was time to start the grill.

You see what I have to put up with?

All I did, was politely suggest, he ought to hitch up his britches before I took his picture. I was trying to be nice, and not broadcast a carpenter crack on the internet. Sheesh.

Anyway, this little portable gas grill is an old friend to me. But Doug has never used it. We had a big charcoal grill in Kentucky that we opted not to bring along. We like our little cottage, but it's got no porch, i.e., no place to keep a big grill out of the rain.

I cut the rest of my onion into slices. Mishap #3. I've also grown accustomed to the big old charcoal grill, and I sliced the onion way too thick for the portable.

Time out, mmmmm... grilled onions...

Once the onions were about half-cooked, we added the steaks. I strongly advocate grilling onions alongside meat. Maybe it's inside my head, but I swear it improves the flavor of both. While the meat was on the grill, I put together a couple of salads.

Spring mix, sharp cheddar, & garlic croutons. Also, tomatoes for me!

The onions started getting black on the outside. Doug took them up. The steaks got to medium-well. Doug took them up. I pulled out the potatoes from the oven, and? Still. Not. Done. Argh!!

So he put the steaks back on the grill and turned the heat down to low. We enjoyed our salads and stalled a little more, but before long the steaks were threatening to over-cook. Screw it. Let's eat. The damn taters had been in the oven an hour! Surely, they must be ready...

Funny, it doesn't look like a poorly cooked mess...

Here's when I actually realized I'd cut the onions too thick. Black on the outside, raw in the middle. Crap. And the taters? A shade too hard inside. Double crap.

Oh well, live and learn. Next time I'll try 425° for the baked potatoes. And cut the onions thinner. And wait a little longer to bring out the meat.

In spite of all this, the well-done steaks came out tender and juicy. Thank you marinate! And thank you Douglas, for happily eating your sub-standard dinner without a complaint.

January 14, 2010

The accidental 5-alarm

Frantic to waste as little food as possible before we depart, I decided on a big batch of chili!

Preface: For me, chili is one of those dishes I make when I need to use up some ingredients. What follows isn't so much a recipe, as a recap.

I started by dicing:
  • One medium sweet yellow onion
  • Half a bulb of garlic
  • 2 or 3 chili peppers we bought this summer and dried
 Notice I got rid of that sepia. Getting more camera-savvy all the time!

WARNING: This is too much dried chili!! The pile looked about right, based on my usual amount of fresh hot peppers. But, hello! Dried spices have a more concentrated flavor. I should know this. Sometimes I am such a dimwit.

Once the chopping was done, I browned a pound of ground beef with a bit of salt and pepper in my chili pot. Doug helpfully drained off most of the grease (as always -- I'm so spoiled), and then I put the beef aside in a shallow, paper-towel lined dish.

Next, I dumped in the onion and garlic, with a touch of salt and pepper, of course. The small amount of oil left is perfect for sweating. Stir occasionally until the onion starts to turn transparent.

Notice I've apparently NOT mastered holding the camera still. Dammit.

At this point I dumped the ground beef back into the pot. Here's the grease stain it left behind. Eww...

Glad that's not in my chili!

(Note: That gross-looking black shit on the right is where the paint is chipped off my stove. I'm a sanitary cook, I swear.)

In the summertime, this is where I would add about 6-10 diced tomatoes (depending on size) with their juice. Unfortunately, winter tomatoes are both expensive and flavor-impaired. Instead I added a big can of whole cooked tomatoes, also with their juice, and cut into quarters.

This is where I added the beans too. Sometimes I use beans from a can, but last night I got ambitious and used dry ones. Granted, these had to soak overnight and then cook for like an hour and a half before I even started the chili. But I like their flavor and texture better. Canned or dried, I dump them in liquid and all.

Now begins the seasoning, all to taste.
  • Salt and pepper
  • Cilantro
  • Cumin (be generous with this; it's what makes chili taste like chili)
  • Chili powder or finely chopped chili peppers (remember, dried peppers are hotter!)
  • Parsley
Most times I also add some green Tabasco, but not tonight. Mercifully I tasted the chili and it nearly lit me on fire. Oops... Good thing we like it spicy 'round here. I put in a spoonful of honey to try and cut down the heat. Which, if I'm honest, didn't really help much.

Add a little water if the chili looks too dry. Then turn the heat way down, stick a lid on the pot, and walk away for at least a half-hour. The longer it simmers the better it tastes. Also important, the longer you plan to simmer the more liquid you need to add. I tend to barely cover the ingredients with water and let the whole mess go for at least two or three hours, stirring occasionally.

This batch is so hot, Satan is sweatin'.

Simmer and stir, simmer and stir, until the liquid is reduced and it's as thick as you like it. Some folks swear by a roux for thickening, but I tend to screw those up something awful. Patience and time will get you the thickness, without the flour (which I swear hurts the taste).

Taste the chili periodically to adjust the seasoning. After about 2 hours I tasted my accidental 5-alarm and found it needed more salt and parsley. Also, I couldn't resist adding the green Tobasco anyway. Since all I had put in were chili peppers, the spiciness was only hitting the back of my throat. Green Tobasco stimulates the tip of the tongue, and I missed that sensation. It really didn't add that much heat, considering.

There's a secret step at the end that I ain't posting on the interwebs. But if you ask me real nice I might share it privately!

For full-on "Misty" style, put some fresh cornbread in a bowl, add a ladle of chili, and top with cheddar cheese and sour cream.

Taking this picture before digging in = impressive restraint

(Also delicious with crackers, tortilla chips, hot dogs, pasta, etc.)

NOTE: Those dairy items actually go a long way toward toning down a too-hot chili. Mine was damn-near con queso, but it was gooooood...