Pages

March 30, 2010

Who says Creation & Evolution must be enemies?

Naw, I'm not about to break bad on the Texas school board or anything. There's a time and a place, and this is neither.

This weekend I fixed up some Philly cheesesteaks, which I have long heralded as the #1 most fit-to-eat dish invented by Yankees. I love them because they're simple and delicious, and use vegetables my husband likes. Yes, I married Mikey from the Life commercials. Those Pop Rocks rumors are greatly exaggerated.

Philly Cheesesteaks 

What to use...
  • Half a large onion
  • Half a large bell pepper
  • 5-8 garlic cloves (depends on their size)
  • 1/2 lb. thin-sliced steak (for extra meaty, yummm)
  • 2 tbsp. olive oil
  • Salt & pepper
  • 5-6 slices provolone cheese
  • 2 hoagie rolls
Coarsely chop the onion, pepper, and garlic. Put a cast iron skillet over a medium burner to preheat.

Can I just start calling this the Trinity?

Lay out the steaks on a cutting board. My germophobia demands I have separate cutting boards for veggies and meat. I know. Cue the guys with butterfly nets. 

Anyway, for this meal I bought thin-sliced top round, but my rule is to buy what's on sale. That's the beauty thing about thin slices; you can buy less expensive cuts and they're not going to be tough. If you have a meat slicer or a good relationship with the butcher, you can buy the cheapest beef available and slice/have it sliced to your liking.

This lot? Under $2!

At this point the cast iron should be plenty hot, so add the oil. I'm a big olive oil proponent, but just about any fat will do here. Now, to make the next step ridiculously easy, roll up the steaks. There's a fancy French word for this knife technique, but my Google muscle is lazy today.

Tube steak. 
*giggle* 
I'm ashamed...

Focus, Misty! By now you can throw the Trinity into the skillet with some salt and pepper. Stir it around a bit to distribute the oil.

Won't take long for the onion to caramelize.

Next, slice through the roll at 1/4- to 1/2-inch intervals. The result will be nice thin strips.

Perfect for cheesesteak.

Unroll the strips and place them over the veggies.

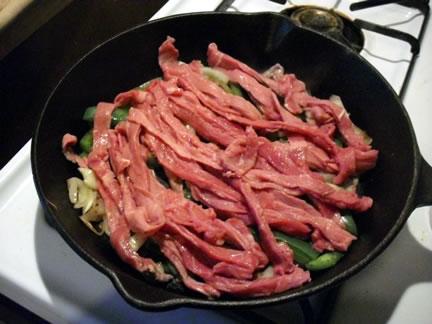
Add a little more salt & pepper, if desired.

Turn the oven to 350° in anticipation of warming the hoagie rolls. Flip the mixture in sections, so the meat is mostly on the bottom. Now, grab a serrated knife, and, wait... uh-oh... is that mold?

@!#?@!

Go ahead and take a moment to berate yourself for not checking the @!#?@! bread ahead of time. But don't panic. You've got tortillas in the fridge right? Sure you do!

Philly Cheesesteaks Beef Fajitas

What to use...
  • Half a large onion
  • Half a large bell pepper
  • 5-8 garlic cloves (depends on their size)
  • 1/2 lb. thin-sliced steak (for extra meaty, yummm)
  • 2 tbsp. olive oil
  • Salt & pepper
  • 5-6 slices provolone cheese Fajita seasonings
  • 2 hoagie rolls Tortillas
  • 1 plum tomato
  • Fajita toppings (optional)
Who says do-overs aren't for grownups?

Add generous amounts of Red Hot, green Tabasco, cumin, and cilantro to the skillet. Slice up a plum tomato and add that too. Stir frequently until the beef is good and brown, and the liquid has reduced.

You know what? That looks fit to eat too!

Wrap the tortillas in damp paper towels and microwave, about 30 seconds for two burrito-sized tortillas. Assemble and serve.

I like a little sharp cheddar & some sour cream.

And unless your husband heard you swearing and came in to see if you'd burned yourself, no one will ever be the wiser. See? Creation and Evolution, strolling happily hand in hand!

March 27, 2010

Spoiled. Rotten.

Not food, mercifully! Just lil ol me. For my sweet, thoughtful momma has hooked me up with the ultimate home-cooking luxury...

Behold!


I have wanted one of these badboys for probably 15 years. It's something I doubt I would ever have bought for myself. Courtney was writing about hers not long before Christmas, and I guess I got to raving about it when I was home for the holidays.

I'd totally forgotten that conversation until my phone rang, about midnight last Sunday. I ran to grab it, because shit man. A call at that hour usually means somebody's either hurt or needs bail money. Not this time!
MOM: Honey, can you turn on QVC?

ME: Uh, hang on. Doug's watching the basketball. I may have to negotiate.

MOM: Tell him Momma says this is important!

(Negotiations ensue.)

ME: Ok, I have it on... Wait... Are you kidding me...?

(Mixers gleam in the studio lights, like heaven on a counter top.)

MOM: Are those the mixers you were talking about?

ME: (dreamily) Yeah...
I've used the phrase blown away before, but never was it more appropriate. She put the smackdown all my, "Honestly, Mom, I really don't need it," objections, even though they were true. I've gotten along a-okay all these years, but OMG I sure did want one. And now it has arrived. I feel extremely, unspeakably grateful.

So! Let the baking commence! I am celebrating with a project right out of the owner's manual: Quick Yellow Cake.


I will never mess with Duncan Hines again.


When Doug got home, he got to use it too, for his legendary homemade frosting. The recipe comes from the Hershey's cocoa box:

Chocolate Buttercream Frosting
  • 1 stick butter
  • 2/3 cup unsweetened cocoa
  • 3 cups powdered sugar
  • 1/3 cup milk
  • 1 teaspoon vanilla extract
The box says melt the butter, but he has better results just bringing it to room temperature. Stir in the cocoa, then alternately add powdered sugar and milk, beating to spreading consistency. Add a small amount of additional milk, if it gets too thick. Stir in vanilla. Makes about 2 cups. 

Also? I had to run out and buy vanilla ice cream. I mean, obviously.

You'd never know it's not my birthday.


At risk of gushing past the point of appropriateness, I wanted to throw this in too. See, when the UPS guy delivered the mixer, he brought two boxes to the door. I assumed the smaller one was the mixer's cover. Oh but no!

Surprise! I told you. Spoiled. Rotten.


I've also never had a proper tea kettle before. Since my college days in the dorms, I've used a Pyrex measuring cup to boil my water in the microwave. I feel so fancy now!

Thank you, Mom.

March 24, 2010

Pasta + Chicken + Cheese = Happy hubby

Today's recipe is an example of how my "small bag of tricks" can translate into a pretty good variety of meals. It combines the same fried chicken technique as honey barbecue wings, with an application for my trusty tomato soup-and-sauce base.

Chunky Chicken Parmesan

What I used for this dish:
  • Multi-use tomato base (recipe here)
  • Oregano, basil, cilantro & parsley
  • 3 boneless skinless chicken breasts
  • Buttermilk, flour and spices for breading
  • Half a box of mostaccioli
  • 1-2 tbsp olive oil
  • Mozzarella and fresh-grated Parmesan cheeses
  • Salt & pepper
I started by soaking the chicken breasts in buttermilk overnight. The next day, I put together the tomato base and seasoned it for pasta sauce. Basically that means adding oregano, basil, and extra cilantro and parsley before the long simmer.

Next, I fried the chicken breasts in my usual way, and set them aside to drain off excess oil. Then I put on some lightly salted water and brought it to boiling. Now, around here we like our pasta on the firm side, so if it's destined for the oven, I only parboil. That's a fancy way of saying half-cook. I looked at the package directions, which said to cook for 10-12 minutes, and cut that number by about 1/3. Ergo, I let the mostaccioli cook for about 7 minutes before draining.

Now it's time to start the layering. I always start with a little bit of olive oil, to help keep the pasta from sticking to the bottom. I sprinkled the olive oil into a shallow baking dish, and tilted the dish around to distribute. After that I spooned in a thin layer of tomato sauce.

Run your sauce through the blender if you don't like it chunky.

I dumped in the mostaccioli with another sprinkle of olive oil...

Spaghetti and rotini also make good chicken parm.

...and added the remaining sauce. I put the chicken breasts on top of that, and finished with a combination of mozzarella and Parmesan. If I have asiago or Romano cheeses around, I usually throw those on top too. I added a final shake of parsley, and baked it in a 350° oven.

In another 30-45 minutes I had a delicious chicken Parmesan!

Let it cool at least 5 minutes before digging in.

I feel I should apologize for how imprecise my cook times always end up. I'm overly reliant on my nose and eyes, I guess, to tell me when food is done. With baked pasta, I'm looking for two signs. The sauce should have gotten good and thick, and the cheese should be turning a nice brown around the edges. It's that cooked-cheese smell that alerts me when I should go in and have a look.

With an iceberg salad on the side, this makes more than enough for Doug to take a generous portion to work the next day. He has jealous office mates.

I realize, at least in my part of the country, it's already getting too warm to heat up the kitchen for this kind of dinner. But, as always, if anybody tries it, I'd love to hear how you made it your own, and how it turned out, in the comments.

March 21, 2010

Steak on the barbie

How do we at Casa York celebrate sunny skies, the start of spring, and college hoops to die for? With steak, silly!

Grilled New York Strip with Steakhouse Sides

What I used:
  • 2 steaks
  • 1 large onion
  • 4 or 5 cloves of garlic
  • Worcestershire
  • Pepper sauces
  • Salt & black pepper
  • 2 large potatoes
  • Butter & sour cream
  • Salad fixins
I believe in honesty in blogging, so there's a hint of confessional in today's post. Pretty much nothing turned out just right for this meal. Thankfully nothing turned out inedible, either. On to the run-down...

While Doug was washing up the breakfast dishes (I am so spoiled), I got the steaks started marinating.

 Thin-cut New York strips

On sale, these babies were $2.25 apiece. Hooray for affordable luxuries! First I lightly salted and peppered both sides. Then I smashed some garlic cloves, and rubbed them on the surface. I tossed in about a half an onion, coarsely cut, and added some celery seed and cilantro.

Note: marinates are a great way to use vegetable scraps, if like me you don't have compost collection. Celery leaves, bell pepper seeds, and lemon peels often make their way into my marinates. I didn't have any of that stuff on hand this particular day. Just throwing it out there.

Next I added the liquid ingredients.

 Artistic? Or just off-center?

A few splashes of Frank's Red Hot and green Tabasco went right on the meat. Then I poured Worcestershire around the edges, until the bottom of the dish was covered. I added enough water to bring the liquid level with the tops of the steaks.

Cover and pop in the fridge.

We watched basketball for a few hours before I started the potatoes. I scrubbed them in cold water and set them on squares of aluminum foil. Here's where things started coming apart. Queen Forgetful over here keeps forgetting to buy proper coarse salt. So plain old Morton would have to do. While the potatoes were still damp, I poured salt into my palm, and rubbed it all over the skins.

Aaand, you can't see the salt. Awesome.

Rolled 'em up nice and tight, put 'em in a baking dish, and popped them in a 350° oven. Mishap #2. I checked them after 30 minutes and they weren't getting done at all. Cranked it up to 400° and sulked. I was freakin HUNGRY already! Soon, it was time to start the grill.

You see what I have to put up with?

All I did, was politely suggest, he ought to hitch up his britches before I took his picture. I was trying to be nice, and not broadcast a carpenter crack on the internet. Sheesh.

Anyway, this little portable gas grill is an old friend to me. But Doug has never used it. We had a big charcoal grill in Kentucky that we opted not to bring along. We like our little cottage, but it's got no porch, i.e., no place to keep a big grill out of the rain.

I cut the rest of my onion into slices. Mishap #3. I've also grown accustomed to the big old charcoal grill, and I sliced the onion way too thick for the portable.

Time out, mmmmm... grilled onions...

Once the onions were about half-cooked, we added the steaks. I strongly advocate grilling onions alongside meat. Maybe it's inside my head, but I swear it improves the flavor of both. While the meat was on the grill, I put together a couple of salads.

Spring mix, sharp cheddar, & garlic croutons. Also, tomatoes for me!

The onions started getting black on the outside. Doug took them up. The steaks got to medium-well. Doug took them up. I pulled out the potatoes from the oven, and? Still. Not. Done. Argh!!

So he put the steaks back on the grill and turned the heat down to low. We enjoyed our salads and stalled a little more, but before long the steaks were threatening to over-cook. Screw it. Let's eat. The damn taters had been in the oven an hour! Surely, they must be ready...

Funny, it doesn't look like a poorly cooked mess...

Here's when I actually realized I'd cut the onions too thick. Black on the outside, raw in the middle. Crap. And the taters? A shade too hard inside. Double crap.

Oh well, live and learn. Next time I'll try 425° for the baked potatoes. And cut the onions thinner. And wait a little longer to bring out the meat.

In spite of all this, the well-done steaks came out tender and juicy. Thank you marinate! And thank you Douglas, for happily eating your sub-standard dinner without a complaint.

March 20, 2010

Botany 051: remedial plant growin

Last week I walked out of my house, and discovered a lovely surprise! I'm happy to share it with y'all on this first day of spring...

The trusty interwebs tell me these are daffodils. In MY yard!

My grandma always called them Easter flowers. You know, because they rise up every spring from the dead winter ground. Perennial. I know that word.

Still, I fear I should have used zoom to capture the above picture. For you see, I am dangerous to plants. I've killed off low-maintenance rock stars like cactus and bamboo. In childhood, when my girl scout troop-mates grew flowers and veggies from seeds, I habitually ended up with a half-pint milk carton of dirt. Just, dirt.

Must I accept this as destiny? No I say! I don't know how many innocent plants will have to die. But I will grow something. Oh yes. I will grow something. In fact, I am tending a sweet tater vine right now.

Matchin my ambition to my abilities

They let preschoolers grow these. Call it a confidence-builder, assuming the damn thing survives. Look closely; I've spotted three roots poking through!

It's alive... it's alive... IT'S ALIVE!

Jamie's magnificent garden blog gets me inspired and keeps me motivated. She informs me I ought not to worry, even though the water was turning cloudy and starting to reek. Don't panic, just change the water. Genius! And she didn't even call me a dumbass.

On her advice I'm also gonna start a windowsill herb garden. Can't you just picture me picking fresh basil for yummy spaghetti sauce? No? Me neither. But I'm gonna try, dammit.

Anyone else out there garden impaired? Or overcome a similar impairment? Actually, maybe don't answer that. I will relentlessly bug you with boneheaded questions. Ask poor Jamie...

March 18, 2010

All boys, report to the gym

That's code, from my middle-school days, for "we're going to talk about periods." Eewww...

It's not very feminist or body-positive of me, but I totally hate my period. I hate PMS, I hate bloating, I hate cramping, I hate bleeding. I hate scrubbing underwear, jeans, and bedsheets. I hate cravings, I hate exhaustion, hate hate hate!

Deep breath... Okay, so, on to how this rant belongs in any way on a food blog. A bit of background first:

I started cooking for realsies last August, in response to being unemployed. Knowing we'd need to cut back on our spending, I decided I'd contribute as much domestic labor as possible. Holler Marxist feminists! Celebrate use value! And it freakin worked. We eat better than ever, and spend about half as much money. Farmers markets, sale bills, and coupons make fresh ingredients more affordable than processed meals. It was either that or go back to tuna fish and ramen noodles. Come on, man. We're in our 30's.

What I didn't expect were some of the health effects. Stupid, right? I mean, I figured we'd feel better, have more energy, maybe lose some weight. And all those things came true, to varying degree. Here's what surprised me. My period.

I used to endure half my life in hormone hell. I'd have a week of nasty, nasty PMS. Tight clothes? Check. Lack of energy? Check. Bitchiness? Speak-to-me-and-I'll-tear-your-lips-off. Then, in the next week, I could look forward to three solid days of debilitating pain. I swear I have two wrinkles on my forehead that are strictly from cramp-cringing. Oh, and heavy bleeding for another four days after that.

Last September, I had a super light, easy period. Only mild PMS, only one day of pain, and only three days of ugly underwear. Score! The next month(s), the same thing. It wasn't til December that I put it all together.

Say... I wonder if the eating better has solved some of my period problems. Duh Misty. Just... duh.

It's now come to the point that I barely even have PMS. Which, actually kind of sucks, because my period sneaks up on me. I guess I need to learn to look for smaller signs. Like, feeling weepy at the Cold Case rerun I was barely watching. As opposed to, chewing my husband's face off for folding a sweater the wrong way. His sweater.

I'm not saying all this to gloat. In fact, it feels more like self-justification. Know what else I hate? Well, lots of things, but snobbery's a big one. And now I'm becoming a food snob. But I can't turn back! A tenth of my life in hormonal hell is SO much less awful than half.

Oh and, I still hate my period. Hate hate hate. But I'm grateful to have a lot less to hate on.

March 15, 2010

A little good karma

See that pretty lady in the middle?


That's Miss Amanda, my beloved baby sister. (The great ox on the end is my brother Jeremy. He'll get his own post someday.) I got a lot of reasons to admire my sister. Pretty. Did I mention pretty? Also super smart and pee-your-pants freakin hilarious. She's a hardworking single mom who don't take crap from anybody. I guess that's no surprise -- the bitch-force is strong in my family.

This year Amanda signed up for the American Cancer Society Relay For Life. I know!!! I am duly impressed! I realize it's not really a race, but you'd have to put a mean dog after me to keep me circling a track all night long.

However, being the dedicated slacktivist sister, the least I can do is help drum up publicity. I'm asking every reader of this post to support Amanda's Relay For Life team.

Relay For Life is a fund-raising effort for the American Cancer Society, a community-based voluntary health organization dedicated to eliminating cancer as a major health problem. The ACS pursues cancer advances through research, education, advocacy and service -- and offers cancer patients, survivors, and their families a place to turn.


Please make a gift today using this secure online form, or this handy printable form.

Amanda is also offering Relay For Life Luminaria for a suggested gift of $5. A luminaria is a paper sack, weighted with sand, containing a lighted candle. Each one bears the name of a person touched by cancer. Please contact me if you're interested in Luminaria, and I'll hook you up with the details.

 Image via Relay For Life

Last, if you're in or near Metropolis, you can sign up to join the team. The ladies would appreciate your company and help!

Thank you everybody, for indulging me in karma-building. Now follow those links and build some for yourself.

March 12, 2010

Multi-use tomato base & veggie (beef) soup

I gotta say, all this self-disclosure is promoting self-awareness. Specifically, I've realized that almost all of my cooking revolves around a fairly small bag of tricks. Onion, garlic, bell pepper, tomato: without those four veggies, we surely would starve!

Here's an example. This tomato base underpins everything from vegetable soup to meaty 5-alarm chili. What can't you create from this starter?

Tomato-based soup/sauce starter
  • One pound ground beef (optional)
  • 2 tablespoons olive oil (for meat-free)
  • Half a large sweet onion, diced
  • Half a bulb of garlic, minced
  • Half a green bell pepper
  • 2 cans tomatoes (alternatively, 10-15 fresh tomatoes, blanched and peeled)
  • 2 sticks of celery
  • 2 or 3 green onions, chopped
  • 1 or 2 bay leaves
  • Salt and black pepper
 The savory basics, plus...

You'll notice there's a piece of pablano on my cutting board but not on the list. What can I tell you? It was hanging around the fridge, not getting any fresher. I love this dish for clearing out veggies so they don't end up looking like science projects.

(Come to think of it, that last sentence made me sound really awful. Like, I would feed my family borderline spoiled shit. Which is so not the case. What I meant to say was, I wanted to use it before it turned questionable. You know, while still fit to eat.)

Back on topic: Brown a pound of ground beef in a saucepan. Drain the excess fat and set the meat aside in a shallow, towel-lined dish. Put the saucepan on medium to re-heat the remaining grease.

For no-meat sauce, skip the ground beef and just heat a couple tablespoons of olive oil in the saucepan. Either way, the oil is good and hot when a shake of black pepper sizzles.

Dump in your onion and garlic and stir gently. Give them a couple of minutes, until the onion starts looking transparent. Just before it starts to brown and caramelize, add the green pepper and some salt.


About, this much green pepper

Sweat that down about 3 more minutes, then add all your tomatoes. In winter I always buy cans of whole tomatoes and use a small knife to kind of shred them. Blanch and peel fresh tomatoes, cut into wedges, and chuck them in -- juice, seeds, and all.

Reduce the heat to medium-low. Add salt and pepper, bay leaf, and celery sticks.

Yep just toss 'em in bloody mary style. 

Bring to a low boil. Depending what the final application will be, season. I add green onion, parsley and cilantro to almost everything; oregano and basil in Italian dishes; or chili powder and cumin for southwestern fare. This is also where I add spicy peppers: hot habaneros, medium jalapenos, and mild pablanos are my favorites.

Sharp eyes may notice there's no ground beef in the photo. That's because this batch was destined for a fabulous chicken Parmesan. But since we've come this far, why not try...

Easy vegetable (beef) soup

Here's an easy finish for the starter. Dump in lentils, peas, green beans, corn, carrots, okra -- any veg you like to eat. Or perhaps, any veg you need to use before it spoils. Reduce the heat to low, cover, and walk away. Stir and taste occasionally, adjusting the heat and seasoning as necessary.

Keep it simmering gently for at least a half an hour. Remember, though, dishes like this just taste better and better the longer they cook. So, my advice is to leave it on the stove until you just can't take it anymore. Come to think of it, this should be an excellent crock pot creation. Do the prep the night before, then dump in to simmer all day.

Last, add a little cooked pasta or rice, and serve over cornbread or crackers.

    March 05, 2010

    Spicy honey BBQ wings

    I wonder, when Doug reads this blog, how much he really enjoys the play-by-play of his dinners. Also, what if he's planning my murder? Waiting patiently until I write up all his favorites? What's he got under that tarp in the basement?  

    I kid! We don't have a basement.

    In other words, he never says much about having his culinary life splashed across the Internet. But a couple of weeks ago...
    Doug: I read where you made a barbecue sauce for your lunch the other day. Maybe you ought get serious with some barbecue. Like, a big old rack of ribs.
    True love.

    One thing I've learned though: it pays to start small, with what you know. So before I go tackling any big old racks of anything, let's play barbecue wings for a while.

    Spicy Honey BBQ Wings
      
    First, gotta marinate the chicken in some buttermilk. Don't have buttermilk? Add 1 tbsp lemon juice per cup of milk, let it sit 15 minutes, then add the chicken. Salt and pepper your wings, and soak them overnight in the fridge.

    Don't mess with them frozen wings.

    Y'all about ready for some deep-fry action?  Preheat some plain vegetable oil in a deep, heavy bottomed skillet on medium-high. Or use a fancy fryer and provoke my jealousy. Any neutrally flavored, high smoke-point oil will work, like canola oil or vegetable shortening. Mainly? Just stay out of the extra virgin olive oil or your smoke detector will hate you. We'll come back to this...

    Next comes the breading. For 10 wings, I probably used 2 cups of flour, seasoned with salt and pepper, maybe marjoram. I add cayenne pepper too, but you can get color without heat using paprika. Two rules for breading: simpler's better, and trust your taste.

     Mix your breading right in a gallon Ziploc.

    So that hissing pot of oil, huh? I poked around the Internet and found temperature recommendations between 350° and 375°. That ain't how I learned to cook though. Here's my secret.

    Dig my action-photography skillz!

    Drop in a pinch of the breading. It'll sizzle up vigorously when the oil is ready. Now we pull those wings out of the buttermilk.

     
    Did I mention, don't mess with frozen wings?

    Take just a few at a time. I did two batches of five, which fit nicely in the Ziploc and pan. Pick up a wing, let the excess milk drip off, and lay it in the bag. Seal the bag once you've made a layer.

    Trap some air in there for easy shaking.

    Toss the wings to coat them thoroughly. Now gently add them one by one to the fryer. This part is a little high-intensity for photographs. Not to mention goop-covered. I will say this: I try to place the wings away from each other in the oil. If you think of a clock face, I start at 12, then work my way clockwise. It helps at about wing four, by which time the oil is spitting like a volcano.

    In, I'd say 12-15 minutes my wings were done. I like the skins extra crispy and golden brown. They could probably have come up at 10-12. It's a personal preference. Once they start floating, the meat is cooked through.

    Eeaat meeee...

    It's really important only to deep fry a few items at a time. You don't want the food to be crowded, nor should you lower the oil temp too much. So I moved this first batch into a casserole dish, and stuck them in a 350° oven. This has a double-bonus of removing some excess oil.

    Eeaat ussss...

    That's pretty much the universal chicken-frying procedure. I'm not gonna lie; it took me some trial and error before getting confident. The buttermilk marinate has almost made it foolproof. I ought to shout out chef Emeril Lagasse for that revelation.

    So while that second batch is frying, let's mix up some sauce, huh? You could actually do this any time, but I'm a multitasker. I poured near-equal parts honey and ketchup in a large mixing bowl.

    I could use more photogenic bowls, I think.

    I was trying for a honey barbecue sauce like you get at the wing places, which? Not so much. I have a feeling those are mustard-based, so at least I have a project for next time. Anyway, to this base I added liquid smoke, cayenne, green Tabasco... probably cilantro... lemon juice, maybe? I've lost it. No, it wasn't a Buffalo Wild Wings honey barbecue. But it turned out sweet-spicy and wholly enjoyable.

     Now you know why a large mixing bowl!

    Just before serving, gently toss your wings in the barbecue sauce. Blot extra sauce on the sides of the bowl and then...

     
    Can't have wings without celery!

    Add a beer and a ballgame, and who needs a sports bar?

    March 03, 2010

    A thousand pardons and a peach

    Two weeks ago I started driving. Atlanta, Metropolis, Peoria, Metropolis, Atlanta -- in six days. It lacked to have killed me, but? Totally worth it!

    A veritable Bradley speech pantheon assembled in Peoria to hang out and coach the current team. I stood in awe. I didn't take any pictures. I kept thinking I had found a bitchin' party. And lawyers love people who take pictures at parties.

    Truth is I've poured all my smarts into the Bradley team since then. I've barely had jokes left to tweet. I apologize for neglecting this space; I have got to learn some balance.

    Oh I've kept cooking meals and taking pictures. There's a good half-dozen recipes comin...

    I just want to ease back in with the peach tea thread from last week. I'm lucky to have found some decent winter peaches. Canned ones also work - pour the juice straight in to boost the flavor. That's JUICE, not syrup. You're on your own with that stuff...

    Today's tea is Lipton Black Pearl.

    Next: boil water, slice peach. I don't mind the skin, but you can always do the old blanch-and-peel. Put some peach slices in your cup, with the teabag.

     The rest of that peach will be my snack in a minute.

    Pour in boiling water and let it steep. I like super-strong tea, so I let it go at least 5 minutes.

    The waiting is the hardest part.

    I admit, I didn't get a good strong peach flavor out of this batch. It's hit or miss in winter, and I should have used more fruit. It was good though. I still drank it.

    Take out the teabag and add some honey (I always leave the peach). Sip immediately to warm your face and fingers.

    For iced tea, steep the peach and teabag longer (10-15 minutes) and use extra honey. Make sure the honey is all dissolved before pouring over ice.

    Coming soon: Mama's got a new deep-fry pan. Get excited!